|
丂仧丂F5 - BIG-IP HotFix ISO僀儊乕僕偺僟僂儞儘乕僪丄僀儞僗僩乕儖丄揔梡曽朄
丂Hotfix傪揔梡偡傞偨傔偺愝掕庤弴傪徯夘偟傑偡丅偙偙偱偼Hotfix-BIGIP-11.4.1-637.0-HF3.iso傪巊梡丅
丂1.丂F5偺僟僂儞儘乕僪僒僀僩偐傜乽Hotfix-BIGIP-11.4.1-637.0-HF3.iso乿傪僟僂儞儘乕僪偟傑偡丅
丂2.丂System 佀 Software Management 佀 Hotfix List傪慖戰偟丄埲壓夋柺偱乽import乿傪慖戰偟傑偡丅
丂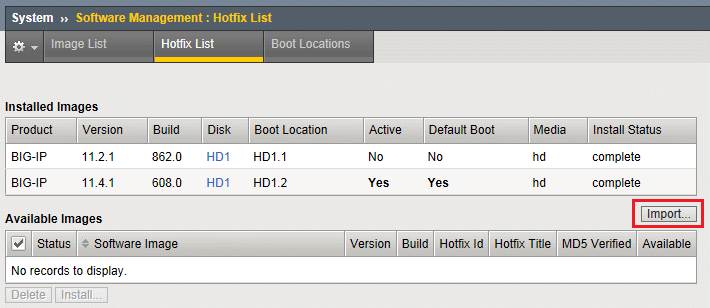
丂3.丂傾僢僾儘乕僪偟偨偄HotFix傪慖戰偟偰丄import傪慖戰偟傑偡丅
丂
丂4.丂Hotfix偺import拞偼夋柺堏摦偣偢偵丄偙偺儁乕僕偺傑傑懸偪傑偡丅
丂
丂5.丂僀儞億乕僩偑惉岟偡傞偲乽Available Image乿偵捛壛偝傟傑偡丅
丂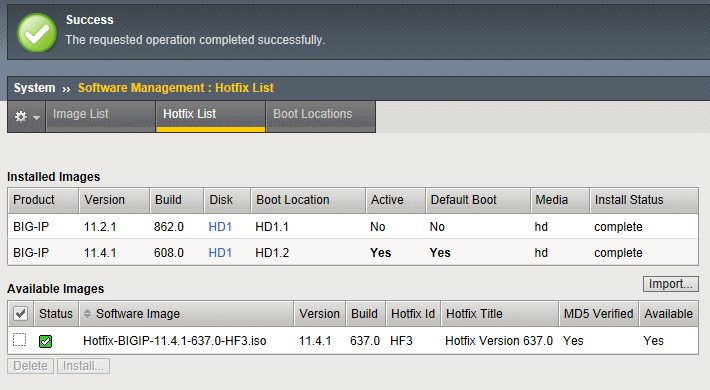
丂6.丂僀儞僗僩乕儖偟偨偄Hotfix傪慖戰偟偰乽Install乿傪慖戰偡傞偲埲壓偑昞帵偝傟傑偡丅Select Disk偱
丂僀儞僗僩乕儖偡傞HD傪慖戰偟偰丄Volume set name偱Volume set傪擖椡偟傑偡丅崱夞偺BIG-IP偱偼
丂HD 1.1丄1.2傪巊梡偟偰偄傞偺偱丄HD1.3偲偡傞傋偔乽3乿 偲擖椡偟偰嵟屻偵乽Install乿傪慖戰偟傑偡丅
丂
丂7.丂HD1.3忋傊偺僀儞僗僩乕儖偑奐巒丅帪娫偑偐偐傝傑偡偑Install Status偑100%偵側傞傑偱懸偪傑偡丅
丂
丂8.丂Install偵惉岟偡傞偲乽Install Status乿偑complete偲側傝傑偡丅埲忋偱import偲install偼姰椆偱偡丅
丂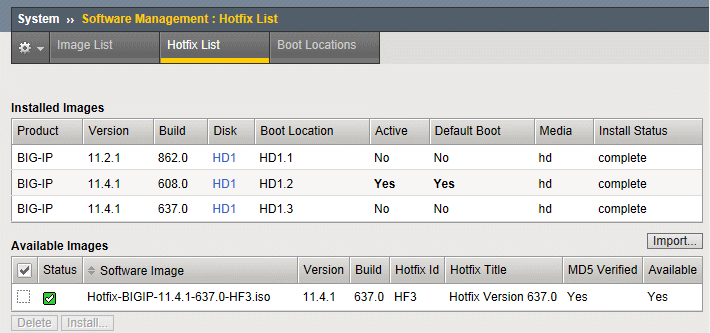
丂9.丂Hotfix ISO僀儊乕僕偺install姰椆屻偵Active Disk傪曄峏偟傑偡丅System 佀 Software Management
丂佀 Boot Locations偺崁栚偱尰嵼偺Active Disk傪妋擣偟傑偡丅尰嵼偼HD1.2偑Active Disk偱偁傝丄HD1.2
丂偵僀儞僗僩乕儖偝傟偰偄傞ISO僀儊乕僕偱婲摦偟偰偄傞偙偲偑暘偐傝傑偡丅偙傟傪HD1.2偐傜丄HD乽1.3乿
丂偵曄峏偡傞偨傔偵丄埲壓偺夋柺偱惵怓偔昞帵偝傟偰偄傞乽HD1.3乿傪慖戰偟傑偡丅
丂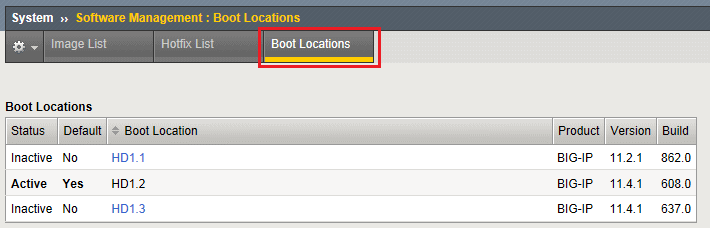
丂10.丂埲壓偑昞帵偝傟傞偺偱丄僐儞僼傿僌儗乕僔儑儞傪堷偒宲偑偣傞偨傔偵丄Install Configuration 傪
丂乽Yes乿傪慖戰偟丄堷偒宲偑偣偨偄僐儞僼傿僌偺偁傞HD傪Source Volume偲偟偰慖戰丅Active Disk 偑
丂HD1.3偵側傞偙偲傪埲壓偺撪梕偱栤戣側偗傟偽乽Activate乿傪慖戰丅慖戰屻偵丄帺摦揑偵嵞婲摦偟傑偡丅
丂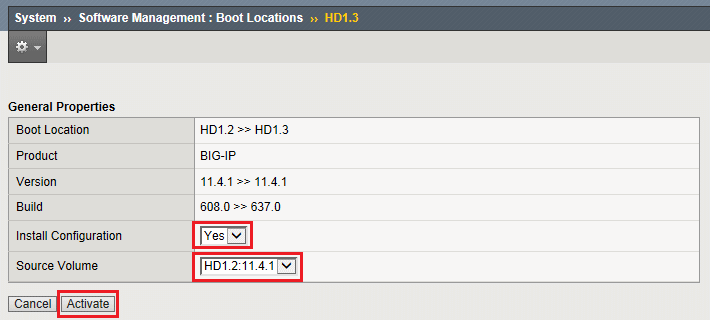
丂11.丂埲壓偺夋柺偑昞帵偝傟偰栺5暘屻偵斾妑揑戝偒側婲摦壒偑敪惗偟偰丄杮奿揑側嵞婲摦偑敪惗偟傑偡丅
丂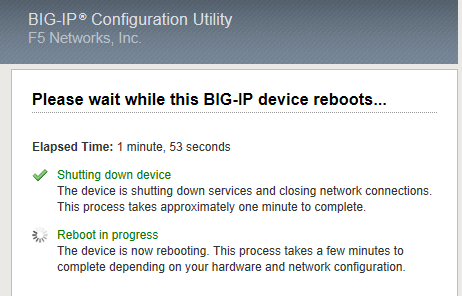
丂12.丂Active偐傜栺15暘屻丄慡偰偺僾儘僙僗偑惓忢偵姰椆偟偰丄惓忢偵捠怣偱偒傞傛偆偵側傝傑偡丅
丂偙偺15暘娫偼挿偔姶偠傑偡偑丄寛偟偰揹尮傪OFF偵偣偢帺摦揑側嵞婲摦偑姰椆偡傞傑偱懸偪傑偟傚偆丅
丂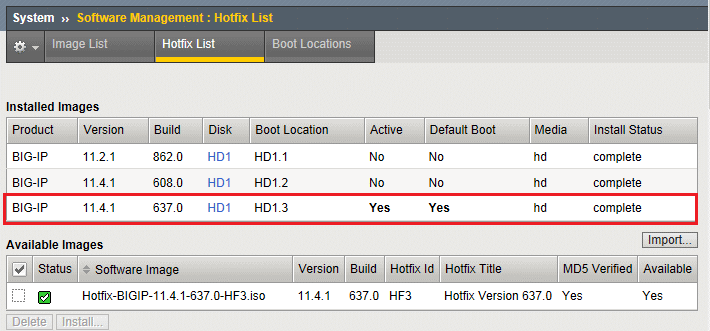
|
丂忋婰庤弴偱偼11.4.1-637.0-HF3傪怴婯偵嶌惉
丂偟偨Boot Location乮HD1.3乯偵僀儞僗僩乕儖偟
丂惉岟偟傑偟偨偑丄偦偺慜採偼BIG-IP僨僶僀僗偺
丂HD偵11.4.1偺OS偑僀儞僗僩乕儖偝傟偰偄傞帠丅
丂偪側傒偵丄BIG-IPV10.x埲崀偱偼OS偩偗偱側偔
丂Hotfix傕尰嵼婲摦偟偰偄傞僨傿僗僋丄偮傑傝丄
丂Active Disk偵僀儞僗僩乕儖偡傞偙偲偼偱偒側偄丅
|
|
丂仧丂F5 - OS僶乕僕儑儞偺尒曽
丂V11.x偐傜偼OS偼Maintenance release偑乽1乿偱偁傞僶乕僕儑儞傪慖戰偡傞偙偲傪偍姪傔偟傑偡丅URL
丂偺堦棗昞捠傝丄End of Software Development偑乽0乿偺応崌偼2擭娫丄乽1乿偱偼3擭娫偲側偭偰偄傑偡丅
丂仸丂End of Software Development偼乽晄嬶崌夞廂乿婜尷丅End of Technical Support偺乽儊乕僇乕傊偺僄僗僇儗乕僔儑儞乿婜尷丅
丂丂丂丂丂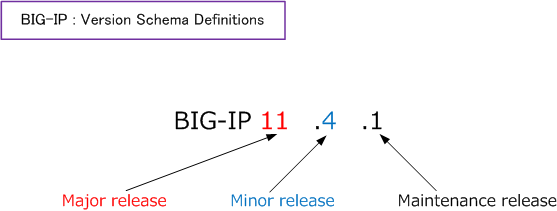
| 儕儕乕僗 |
愢柧 |
| Major release |
丂怴婯偺僴乕僪僂僃傾僒億乕僩傗廳梫側傾乕僉僥僋僠儍曄峏側偳偑娷傑傟偨儕儕乕僗丅
丂Major releases include significant changes in behavior, added functionality,
significant
丂increases in performance, new hardware supportand/or significant architectural
changes.
|
| Minor release |
丂奺庬晄嬶崌乮僄儔乕/僶僌乯懳墳偵徟揰傪偁偰偨儕儕乕僗丅怴婡擻偑捛壛偝傟傞応崌傕偁傞丅
丂A minor release focuses on addressing product errors or bugs. New functionality
may
丂be included, but is typically of limited nature or optionally applicable
|
| Maintenance release |
丂僶僌傗僙僉儏儕僥傿廋惓偵徟揰傪偁偰偨儕儕乕僗丅埲慜偺hotfix偑慡偰慻傒崬傑傟偰偄傞丅
丂A maintenance release typically addresses bug and security fixes. It will roll-up all
丂previous hotfixes. No change in behavior or new functionality is introduced.
丂A maintenance release may support new hardware.
|
|