|
◆ BIG-IP : HAの設定 - 構成例
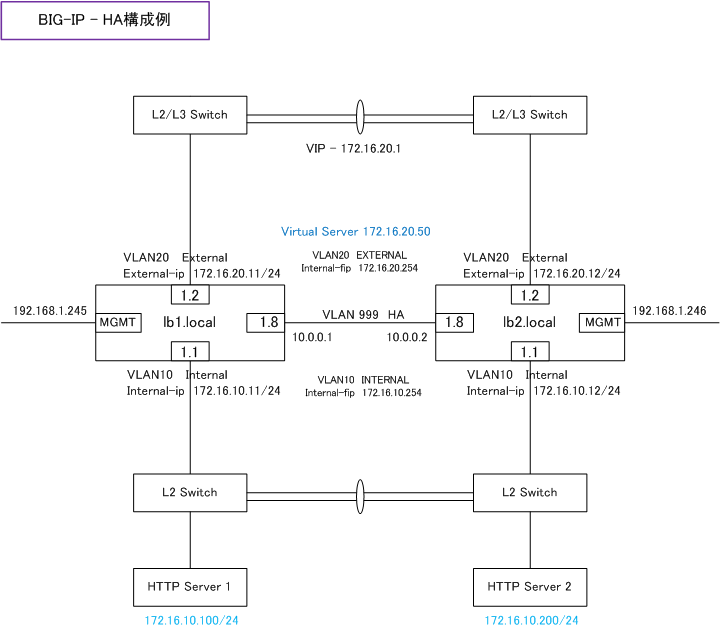
※ 各ポートごとに異なるVLANを割り当てる設計が推奨。
※ ポート数に余裕がある場合はHAリンクは物理リンクを2本に使用することが推奨。
【 lb1.local 】
| インターフェース名 |
IPアドレス/Netmask |
所属するVLAN名 |
VLAN番号 |
PortLockdown |
Traffic-Group |
| Internal-ip |
172.16.10.11/24 |
Internal |
10 |
Allow Default |
non-floationg |
| Internal-fip |
172.16.10.254/24 |
Internal |
10 |
Allow Default |
floationg |
| External-ip |
172.16.20.11/24 |
External |
20 |
Allow None |
non-floationg |
| External-fip |
172.16.20.254/24 |
External |
20 |
Allow None |
floationg |
| HA-ip |
10.0.0.1/24 |
HA |
999 |
Allow All |
non-floationg |
【 b2.local 】
| インターフェース名 |
IPアドレス/Netmask |
所属するVLAN名 |
VLAN番号 |
PortLockdown |
Traffic-Group |
| Internal-ip |
172.16.10.12/24 |
Internal |
10 |
Allow Default |
non-floationg |
| Internal-fip |
172.16.10.254/24 |
Internal |
10 |
Allow Default |
floationg |
| External-ip |
172.16.20.12/24 |
External |
20 |
Allow None |
non-floationg |
| External-fip |
172.16.20.254/24 |
External |
20 |
Allow None |
floationg |
| HA-ip |
10.0.0.2/24 |
HA |
999 |
Allow All |
non-floationg |
◆ BIG-IP : HAの設定 - 前提条件
BIG-IPデバイスで冗長構成を組む際に以下の状態であることを先ず確認しましょう。
1. 両方のBIG-IPデバイスのOSが同じバージョンであること
2. 両方のBIG-IPデバイスで異なるホスト名がFQDNで設定されていること
3. 両方のBIG-IPデバイスで異なるIPアドレスがMGTMポートに設定されていること
4. 両方のBIG-IPデバイスでVLAN名が同じであること
5. 両方のBIG-IPデバイスでNTP同期が行われて、タイムゾーンも同じであること
BIG-IPデバイス間は「Failover用ポート」と「HA用ポート」でケーブル接続していればHAを構成できます。
◆ BIG-IP : HAの設定 for Active機
1. 「Network」⇒「VLANs」で「Create」ボタンを押して、HA用のVLAN設定を行います。
2. 「Network」⇒「Self IPs」でCreateボタンを押して、HA用のVLANのIPアドレスを設定します。

3. 「Device Management」⇒「Devices」で自分自身「lb1.local(Self)」を選択します。

4. 「Device Connectivity」⇒「ConfigSync」でHA VLANに指定したIPアドレスを選択してUpdate。
5. 「Device Connectivity」⇒「Network Failover」で「Add」ボタンを押します。
6. HA VLANに設定したIPアドレスを選択します。
7. 「Device Connectivity」⇒「Mirroring」を選択して、HA VLANに指定したIPアドレスに選択しUpdate。
※ この設定がコネクションミラーリングの大本の設定。さらに、Virtual Serverごとに有効 ・ 無効を設定できます。
※ HAの物理リンクを1本にする場合は必ず「Secondary Local Mirror Address」にもアドレスを指定することをお勧めします。
8. 「System」⇒「Configuration」⇒「Device」⇒「NTP」を選択して、NTPサーバのIPアドレスを設定。
※ 複数のNTPサーバを設定しても、優先順位を指定することはできないので注意。
9. BIG-IPデバイスにコンソール接続またはSSH接続して、NTPサーバに同期しているのかをCLIで
ntpq -np コマンドで確認します。以下のように、 コマンドの実行結果で先頭に * マークがあれば
同期が完了しています。同期が完了するまでに少し時間がかかります。
なお、時刻同期はLinuxとして行うものなので、ntpq -np コマンドは、tmshモードではなくて
configモードでコマンドを実行して確認します。

|