|
◆ SSL-VPN : Cisco ASA設定例 - 証明書認証
下図の構成を前提にCisco ASAとWindows Server(Enterprise)の設定方法と操作方法を解説します。
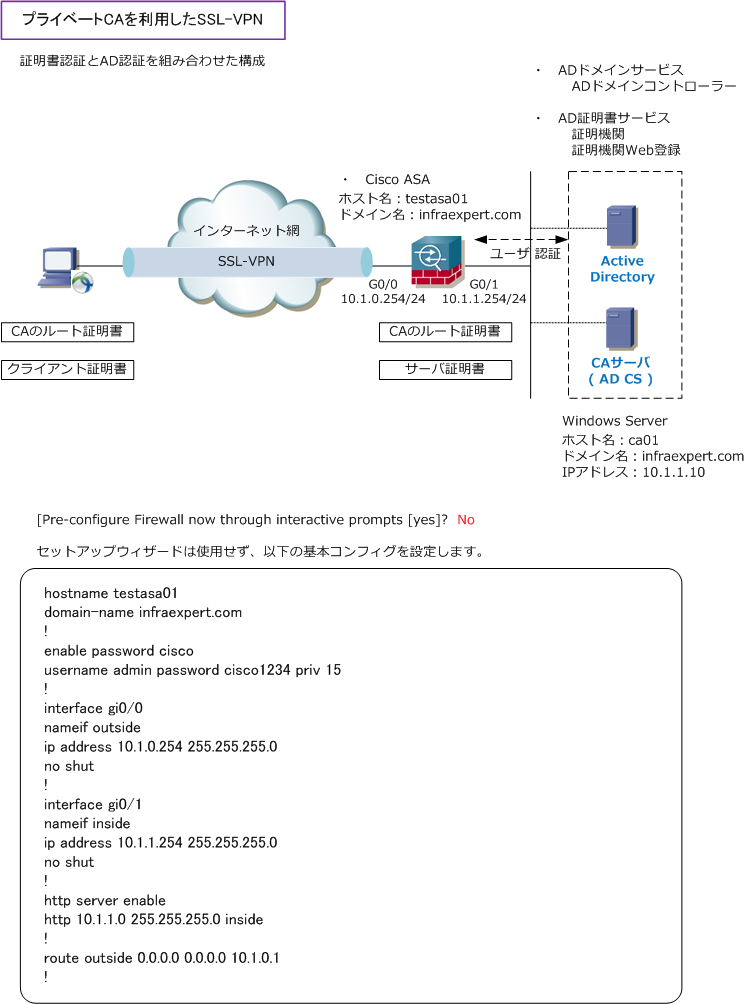
◇ Cisco ASA Gi0/1のアドレスである「https://10.1.1.254/」にアクセスし、ASDMを起動させましょう。
◆ Cisco ASA - CSRの発行手順
「Configuration」→「Device Management」→「Certificate Management」→「Identity Certificates」
を選択して、以下の画面を表示させて右側にある「Add」を選択します。
「Trustpoint Name」に名前を入力。サーバ証明書のためのCSR作成に関連づけるような名前にしましょう。
「Add a new identity certificate」にチェックして、Key Pairの右側にある赤枠の「New...」を選択します。
「Key Type」はRSAにする必要があります。"testasa.key"という名前のKey pair(秘密鍵と公開鍵)を作成。
「Size」は1024または2048ビットを選択(推奨は2048)。「Usage」は「General purpose」を選択した上
で「Generate Now」を選択します。
※ CSRにはここで作成したKey pairのうち公開鍵のみが埋め込まれる
「Generate Now」を選択した後、先の画面に戻り青枠の「Select」を選択します。すると以下の画面が表示。
DN Attribute値から各Attirubeに値を入力して Add を選択します。DN (ディスティングイッシュネーム)値
は「SSLサーバ証明書を導入するサーバでのCSRの生成 - ディスティングイッシュネームとは」を参考下さい。
| Attribute |
Value |
| Common Name(CN) |
testasa01.infraexpert.com
|
| Department(OU) |
information system
|
| Company Name(O) |
infraexpert
|
| Country(C) |
JP |
| Location(L) |
TOKYO |
「OK」を選択して、以下の画面で設定値確認後に「Add Certificate」を選択します。
| Add a new identity certificate |
| Key Pair: |
testasa.key
|
| Certificate Subject DN: |
CN=testasa01.infraexpert.com
|
CSRの名前と保存場所を「Browse..」で選択後、OKボタンを押します。
|
以下の「The CSR was saved successfully」
が表示されたらCSR作成が成功しています。
|
|
CSRを発行して証明書をインストールしていない状態では以下の通り Pending であることを確認できます。
次回はWindows Server AD証明書サービスでの証明書発行とその証明書のインストール方法を解説します。
◆ 上記設定内容は、CLI では以下のコマンドが該当
crypto key generate rsa label testasa.key modulus 2048 noconfirm
crypto ca trustpoint TPOINT-SERVER
revocation-check none
keypair testasa.key
id-usage ssl-ipsec
no fqdn
subject-name CN=testasa01.infraexpert.com,O=infraexpert,OU=information
system,C=JP,L=TOKYO
enrollment terminal
crypto ca enroll TPOINT-SERVER noconfirm
|
|